HDRI in Lightwave
This tutorial has been written to serve Hyperfocal Design’s customers who are using their HDRI sky textures – download a free sample now to follow along. They can however be just as easily used for other HDRI environments. This tutorial attempts to cover every aspect of HDR rendering in Lightwave 8, but since radiosity and HDR support hasn’t changed much since 6.5, users of older versions should be fine. Provided that your HDRIs are of good quality, you should have a great end result for your background, lighting and reflections using HDRI after completing this tutorial.
This tutorial is not aimed at the novice, it will not explain how to perform very basic operations in Lightwave, please consult your manual if you need help with these basics.
If you are not up to speed on HDRI or the lingo, you may wish to first read our Understanding HDRI article.
LW8 supports HDRI out of the box, no plugins are required.
HDRI Artifacts – Splotches, Speckles, Tiny Dots
Before we begin the tutorial and cover all of the HDR controls in LW8, we must address a very common problem that exists in some 3d software packages that support radiosity and HDRI. This problem is usually called “splotchiness” or “speckles”, and it can be caused by either radiosity settings which are too low to create smoothing lighting and shadows, or the use of HDRI maps which contain small but bright regions, such as windows or the sun.
Each software package has its own method of fixing this problem, as detailed below.
A large percentage of Hyperfocal’s HDR skies are photographed with the sun just behind or fully covered by clouds, increasing the size of the light source and giving the artist the option of creating either a soft or hard shadowed look.
HDRI in Lightwave Tutorial
Image Editor
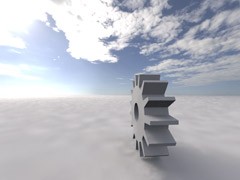
Image Editor (F6) -> Load your HDR in .hdr format -> set gamma to 2.2 in the editing tab. Most HDR images are created at gamma 2.2 so failing to do this will result in very poor renders with loads of splotches/speckling artifacts.
 |
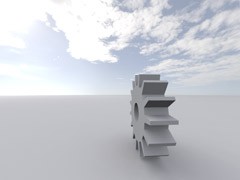 |
| Gamma 1 | Gamma 2.2 |
Adjust Brightness
Adjusting brightness will affect the brightness of the hdr itself as well as the lighting of the scene.
Contrast
Will adjust the contrast of the hdr and the lighting, but introduces splotching/speckle artifacts.
Hue & Saturation
Adjust to suit your scene/taste
Filters
If you are having trouble with speckle/splotching artifacts, apply a full precision blur filter to your lighting hdr (see the two hdri method)
HDRI Environment Map
You can set up your scene in one of two ways.
One HDRI: Use one HDRI for both your background image and for your lighting, either mapping to a 3d inverted sphere or as a lightprobe environment.
Two HDRIs: Use one HDRI mapped to an inverted background sphere which will be visible in the render, but will not provide lighting. Then use another HDRI mapped to another inverted sphere which will provide lighting to the scene but will not be visible in the render.
One HDRI: Inverted 3D Sphere Method
Load a sphere object with inverted normals and apply the hdr as a spherical map.
Inverted Sphere
Luminosity 100%
Diffuse 0%
Seen by Camera: ON
Seen by Rays: ON (when using only one HDRI, we need the bg image to also provide lighting)
All shadows options: OFF
Exclude all lights from lighting this object
For the sphere, you will need to make it large enough so that it appears to be in the distance, however the larger (further away) the sphere is, the more innacurate the lighting and shadows become. See the GI/Interpolated section to set this up correctly.
Once your HDR image is mapped, you can edit the properties to align/rotate the environment/sky as you wish.
Select Lights (Shift L) -> properties
Clear all lights – all lighting will be provided by the HDRI
Set light intensity to 0
One HDRI: Light Probe Environment Method
A big drawback to this method is that you can’t view your hdr in the viewport in realtime, you have to do test renders to find out where the sun is. This makes adding a direct light over the sun extra difficult as well (see adding traditional lights for hard edged shadows) So this method isn’t recommended.
Convert the lat/longitude spherical format to lightprobe format in a program such as HDRShop.
Open the effects window (^F5) -> add Environment -> Image World -> edit properties -> select light probe image
Two HDRIs: Inverted Spheres Method
Load two spheres with inverted normals. One will be used to display the background, whilst the other will be invisible and provide our lighting. The background sphere can be any size you require, and your lighting sphere is best made as small as possible to increase the lighting accuracy.
Background Sphere
Luminosity 100%
Diffuse 0%
Seen by Camera: ON
Seen by Rays: OFF (Background image not included in lighting calculations)
All shadows options: OFF
Exclude all lights from lighting this object
Lighting Sphere
Luminosity 100%
Seen by camera (OFF) (Don’t want this to render)
Seen by rays (ON) (Used in lighting calculations)
All shadow options (OFF)
Exlude all lights from lighting this object
Global Illumination
Depending on what your HDR image is of, the following settings can be reduced or increased to create the most accurate, smoothest, speckle free lighting and shadows. HDRIs with small, bright lightsources will need higher settings whilst lower contrast HDRIs with larger more diffuse lightsources won’t need as much.
Settings
Lights -> properties -> GI -> Enable Radiosity
Turn “shading noise reduction” on
Intensity: Affects the brightness of the hdr texture and how bright the lighting is for the scene, values over 100% are possible.
HDRI Size
For your GI lighting solution, you can choose to use the full size HDRI or you can size it down and possibly blur it if you need to. Down sized, blurred HDRIs for lighting can speed render times and reduce artifacts.
Scene
Another thing to take into consideration is what exactly your scene looks like – smooth shaded untextured scenes are going to show up GI splotches much more easily than a heavily textured gritty street scene for example.
Monte Carlo
Slower, more accurate and also creates finer, brighter speckle artifacts which are harder to remove.
Rays per eval: Since Monte Carlo is already quite accurate, you don’t need to go too high with this setting. The higher you go the better the quality and the longer the render times.
Interpolated
Lower quality, but much faster rendering. Low quality can be offset with some smart anti aliasing/blur settings (see “Rendering”)
Rays per eval: at least 10X30 for decent results. The higher you go with this setting the better the quality and the longer the render times.
Gauge your settings for “min evalutation spacing” by how far off the ground your object appears, and by how smooth the shadows are. This setting has a big effect on render times. Values that are too high reduces lighting accuracy, hence your objects can appear to float off the ground. Values which are too low are accurate but cause long render times. You will need to set the physical scale of your sky model and then adjust the min evaluation spacing.
Min Evaluation Spacing: 3-15mm
This can vary a lot depending on your scene and requirements, lower is always better causing longer render times.
Set Tolerance at 0.1 – 0.3
Lower tolerance means higher accuracy and longer render times.
Play with all of the above settings until you reach an acceptable speed/accuracy trade off.
Colour Casts
Certain types of HDRI may lend themselves to produce an unnatural colour cast across your image. Bright, blue skies are a common cause of this problem. To fix this you can reduce the saturation of your lighting HDR image (see the 2 HDR method above), or use the HDRI in combination with a direct light (below).
Adding Tradititional Lighting for Hard Edged Shadows
If you have a HDRI such as a midday sky with no clouds (which should feature crisp shadows), you can use the following method to create this effect. Create and place a direct light source precisely over the sun, pointing into your scene, now reduce either your HDRI or direct light intensity/brightness to around 75%. Adjust your light colour and intensity to suit. Your radiosity settings can be reduced now as well if you wish, since you won’t require as much accuracy to make the shadows look good.
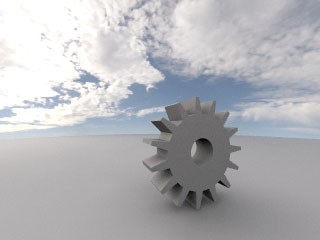
On the left we have only HDRI lighting/shadows, giving the appearance that the sun is behind the clouds. On the right is HDR lighting/shadows at 75%, with a direct light, giving a higher contrast look with hard edged shadows.
If you would like to use fuzzy edged shadows using a direct light, check out the following links on how to achieve this:
http://members.shaw.ca/phroggrafix/tutorials/spinning/spinning.html
http://www.ethereal3d.com/Tutorials/3D%20lighting/3D%20Lighting.html
http://www.kolumbus.fi/erkki.halkka/plugpak/Tut/OC_Behind.html
Reflections
To enable reflections, simply set your reflection values in surface editor and make sure raytraced reflections are enabled in render options. If you only wish to reflect the HDRI you can go the surface editor and set the HDRI as an environment map, speeding up your render times greatly. You will notice that even on object surfaces with a very low reflectivity, extremely bright regions of the HDR will still reflect accurately.
Rendering
You may notice even with med-high settings for min evaluation spacing, tolerance and rays per eval, you might still have a slightly blotchy image. To solve this and smooth out your end result, use at least enhanced low AA with 100% motion blur. The resulting image should be perfectly smooth.
Image Viewer FP
For further post render control, go to render options and enable Image Viewer FP. When your render is complete, you can adjust the white and black points in a form of tonemapping. In the finished render window go to File -> Image controls and adjust the white and black points, this will have a similar effect to using levels controls in Photoshop, but in 32 bit.
Saving
Save in .hdr format if you wish to edit your render in HDR compatible editors.
This article was written by Matt Lester from 3DViz and Jay Weston for Hyperfocal Design’s HDRI Skies image collection.
 Hyperfocal Design